Tape Stain Removal

[mp_row] [mp_span col="12"] [mp_text]

Tape stain removal is a tedious task and on occasions very unrewarding because the stain remains embedded in the paper no matter how you treat it. Some other times it just happens that the stains disappear completely (this is not a common occurrence).

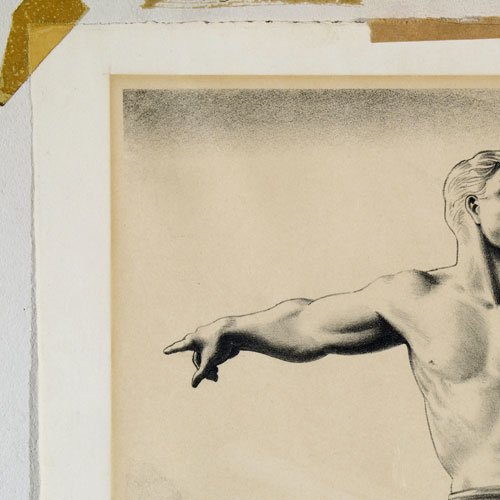
A few days ago, a client brought to the studio a lithograph titled Eternal Vigilance is the Price of Liberty by the artist Rockwell Kent. The sheet had an intense overall yellowing, particularly inside the mat window; there was also a gummed kraft paper strip, residue from an old hinging, and finally, the print was hinged to a back mat with a regular rubber-based film tape that had become extremely yellowed as well.

The typical sequence followed for tape removal is first to remove the carrier, then the adhesive residue, and finally the stain reduction procedure.

In this particular case, our procedure was as follows:

[/mp_text] [/mp_span] [/mp_row] [mp_row] [mp_span col="6"] [mp_row_inner] [mp_span_inner col="6"] [mp_image id="3259" size="full" link_type="lightbox" link="#" target="false" caption="true" align="left"] [/mp_span_inner] [mp_span_inner col="6"] [mp_image id="3260" size="full" link_type="lightbox" link="#" target="false" caption="true" align="left"] [/mp_span_inner] [/mp_row_inner] [mp_row_inner] [mp_span_inner col="12" classes=" motopress-space"] [mp_space] [/mp_span_inner] [/mp_row_inner] [mp_row_inner] [mp_span_inner col="6"] [mp_image id="3261" size="full" link_type="lightbox" link="#" target="false" caption="true" align="left"] [/mp_span_inner] [mp_span_inner col="6"] [mp_image id="3262" size="full" link_type="lightbox" link="#" target="false" caption="true" align="left"] [/mp_span_inner] [/mp_row_inner] [mp_row_inner] [mp_span_inner col="12" classes=" motopress-space"] [mp_space] [/mp_span_inner] [/mp_row_inner] [mp_row_inner] [mp_span_inner col="6"] [mp_image id="3263" size="full" link_type="lightbox" link="#" target="false" caption="true" align="left"] [/mp_span_inner] [mp_span_inner col="6"] [mp_image id="3265" size="full" link_type="lightbox" link="#" target="false" caption="true" align="left"] [/mp_span_inner] [/mp_row_inner] [mp_row_inner] [mp_span_inner col="12" style="min-height: 40px;" classes=" motopress-space"] [mp_space] [/mp_span_inner] [/mp_row_inner] [mp_row_inner] [mp_span_inner col="12"] [mp_image id="3268" size="full" link_type="lightbox" link="#" target="false" caption="true" align="left"] [/mp_span_inner] [/mp_row_inner] [mp_row_inner] [mp_span_inner col="12" style="min-height: 90px;" classes=" motopress-space"] [mp_space] [/mp_span_inner] [/mp_row_inner] [/mp_span] [mp_span col="6"] [mp_row_inner] [mp_span_inner col="12"] [mp_text]

1.Removal of the carrier, which was brittle and separating from the paper, by peeling it off with the help of scalpels and tweezers.

2.Removal of the adhesive. To do so we prepared a Klucel G based gel with an appropriate solvent. Klucel G was selected precisely because of its capability to dissolve and swell in polar organic solvents, as well as in water. Since the lithograph was in need of a bath to remove acidity and discoloration products, this bath would remove any gel residues as well. The solvent gel was applied with a brush, allowed to act for two-three minutes and removed with a scalpel. A second gel application was necessary, once again taking it away after a couple of minutes. At this point the stain had diminished considerably, but was still clearly distinguishable.

3.The stain reduction was performed at the same time that the lithograph was treated for the overall discoloration. First, a regular bath to remove the degradation products and acidity inside the paper was performed. This bath also allowed the elimination of the residues from the Klucel G used as the carrier for the solvent. Afterwards, we proceeded to treat the print with an artificial light bleaching process. 

[/mp_text] [/mp_span_inner] [/mp_row_inner] [mp_row_inner] [mp_span_inner col="12"] [mp_image id="3267" size="full" link_type="lightbox" link="#" target="false" caption="true" align="left"] [/mp_span_inner] [/mp_row_inner] [/mp_span] [/mp_row] [mp_row] [mp_span col="12"] [mp_row_inner] [mp_span_inner col="12" classes=" motopress-space"] [mp_space] [/mp_span_inner] [/mp_row_inner] [mp_row_inner] [mp_span_inner col="12"] [mp_text]

The results of the tape stain removal talk for themselves; also the light bleach treatment was outstanding regarding the overall discoloration, as well as the remaining tape stains.

[/mp_text] [/mp_span_inner] [/mp_row_inner] [/mp_span] [/mp_row] [mp_row] [mp_span col="6"] [mp_image id="3266" size="full" link_type="lightbox" link="#" target="false" caption="true" align="left"] [/mp_span] [mp_span col="6"] [mp_row_inner] [mp_span_inner col="12" style="min-height: 50px;" classes=" motopress-space"] [mp_space] [/mp_span_inner] [/mp_row_inner] [mp_row_inner] [mp_span_inner col="12"] [mp_text]

Para español haz click aqui

[/mp_text] [/mp_span_inner] [/mp_row_inner] [mp_row_inner] [mp_span_inner col="12"] [mp_download_button attachment="3279" text="Download" icon="fa fa-download" icon_position="left" full_width="false" align="left" mp_style_classes="motopress-btn-color-silver motopress-btn-size-middle motopress-btn-rounded motopress-btn-icon-indent-small"] [/mp_span_inner] [/mp_row_inner] [mp_row_inner] [mp_span_inner col="12"] [mp_text]

http://www.conservation-wiki.com/wiki/Hinge,_Tape_and_Adhesive_Removal

http://cool.conservation-us.org/coolaic/sg/bpg/annual/v02/bp02-13.html


[/mp_text] [/mp_span_inner] [/mp_row_inner] [/mp_span] [/mp_row] [mp_row] [mp_span col="12" classes=" motopress-space"] [mp_space] [/mp_span] [/mp_row]

No Comments Yet.

Leave a comment